Pages

Thursday, December 27, 2012

[belated] MERRY CHRISTMAS!

A few days late, but MERRY CHRISTMAS!!!


[Yes, I am the palest and have the largest melon in our family]

The kids were spoiled, as usual. We ate lots of yummy food. And we decided this year not to do gifts for anyone over 18. Gotta say, NOT getting gifts or having the stress of buying for everyone was so nice. And such a welcome change. Truly made it feel more like Christmas. 


[the WHOLE fam]

 
[never ended up doing Christmas cards <oops>, but here is the photo I would have used. Love these guys and am oh so thankful for them.]

<3 Lindsey

[newborn shoot] jensen

Followers of this blog might be familiar with this adorable family....


My bff, Shelby, had her second little girl a few weeks ago and I had the honor of taking their newborn pics. Jensen is just as cute and almost identical to her big sister, Krosby. 

Shelby and I came up with the idea to take some pictures of her on a chalkboard. I saw this print on Pinterest and fell in love with the design. So I copied it and used it as the backdrop for the shoot : ) I also got lots of chalkboard art tips from fellow coworker and awesome chalkboard artist, Lisa. Check out her very helpful post about chalkboard art HERE.


During the shoot I thought none of the pics turned out as well as I hoped, so I was pleasantly surprised when I saw Jensen's happy face in this one. Perfect! 

And can't leave out big sister, Krosby. She really is the cutest, funniest, and smartest [almost] two year old ever : )


<3 Lindsey

Friday, December 14, 2012

[jan wreath class]

Hey all!

Here's a little friendly reminder about my next wreath class!


It's a 17" wreath (including all the white fluff) covered in lots of pretty ivory-ish tulle (aka white fluff). There are three pretty glitter snowflakes and humongo felt bow as the cherries on top.

All supplies are included. All you need to bring are a glue gun and scissors. Cool, right?!

I think it's the perfect addition to your winter holiday decor. Something you can leave up even after Christmas is over to soften the blow of the best holiday on earth being over.

And here's how I winterized my home with it!


Hard to tell but there are a bunch of white pom poms as snowballs hanging up that almost was the death of me while trying to make them and hang them. Fyi, get a pom-pom maker and tacks to hang them. Tape does not work. Biggest mistakes I made. Anyways, and I also got some foam cones at Hobby Lobby and decorated them to coordinate with the theme. One is covered in tinsel pipe cleaners, another in big sequins, and the last in felt. <Might> do a post about them later...

And because the walls at work where we display our class samples is white, and my wreath is white, I decided to make a backdrop for it. Gotta say, chalkboard art is pretty fun. Think this will be my new tradition with every class.


So yeah, there's all the ^^^ important info for the class above. I think right now you have to call into the store to sign up (480)854-2303. But in the near future, you can sign up HERE and save 10% on the class when you do!

Hope to see you there!

<3 Lindsey

Thursday, December 6, 2012

[last photo shoot]

Last weekend marked the end to my "career" as a photographer.

Realized this year that juggling a part time job, teaching wreath classes, parent stuff, house stuff, AND photography was a bit too much.

I NEED down time. And time to do fun things.

My goal in life is to be as boring as possible, so I would say I'm about halfway towards mission accomplished : )

Anyways, this last shoot was perfect. Literally perfect. It was like my dream shoot. The mom brought the cutest props. Dressed her girls in the cutest clothes. The girls could have passed for professional models.

So much fun. And so happy with how these turned out!


<3 Lindsey

Friday, November 9, 2012

[family pics + my triangle quilt]

Yesterday was family picture day!

Originally we were going to have someone take them, but then they had to cancel cause of a funeral <very sad> and then they got sick <also sad> SO I just didn't want to reschedule again. I'm impatient like that. And I'm a "photographer" who also happens to own a tripod. So yeah I thought I'd save us some money and add a whole lot of stress to our day and take them ourselves!

Brilliant!

Not really!

First of all, right after I got myself ready (which is a lot of work and my least favorite chore) I looked outside and what do you know, I saw a beautiful rainbow. And lots of rain clouds.

But I already spent way too much time giving myself an unsuccessful makeover so I said screw the clouds, I'm making this work! Cause if I have to apply this much makeup again I'm going to cry! <optimism at it's finest>

So I got the kids ready, loaded up the van. Left for downtown Tempe. Five minutes into our drive, I realized I forgot my blanket. So we turned around, grabbed it, and left again.

Once we arrived, one of the kids didn't want to cooperate. The clouds were making it darker. Setting up the tripod, posing everyone, trying to figure out where I would sit, pressing the timer button, running over before it took the picture, forgetting where I planned to sit, panicking, and smiling while making sure I wasn't flashing the camera in my dress was pretty much how every single shot went.

Exhausting.

So I gave up and prayed we had at least one winner. And we did.

Here it is...


You would never know I was sitting in a puddle and that the kids were groaning about our "one last try". Okay maybe you can with the last one, but you can also tell they were trying extra hard to disguise their annoyance with me. And they're all looking at the camera and no one is blinking.

That's all that matters to me.

Here are a few others...


I have one more winner, but I'm saving it for our Christmas card. I'll share it soon!

And also, I mentioned recently that I made my very own, just for me, no one else can use, okay fine you can use it, dogs aren't allowed to lay on it, fine whatever the dogs can lay on it, and now it's covered in dog hair and kid germs QUILT!!!!


I wasn't loving it a whole lot at first, but it's growing on me. And don't tell the kids, but I secretly love that they cuddle with it. Especially when they're not feeling well. Tugs at the Mama heart strings.

If you want to make your own triangle quilt, you can follow this tutorial! My triangles are 6" tall and I used a triangle ruler just like in the tutorial. I've seen some tutorials where they don't use one, but I think it makes it so much easier and worth the extra $$! I didn't add a border or anything. Just kept adding triangles till I was happy with the size : )

That's everything! Happy <actual> Friday! Yay!

<3 Lindsey

Thursday, November 8, 2012

[ketchup]

As in the activity teachers do to make catching up on school work sound fun. Except I'm catching you up on boring things I've done lately.

Sold?

<Don't leave me!>

Ok, so a few of the VERY EXCITING things I've done since I was last on here was....

PAINT MY CALENDAR HOLDER!!!

<Seriously, don't leave...yet>

When I was a freshman in high school, my mom gave me this calendar holder. I loved it because it held a beautiful calendar full of Amish country illustrations. I was super popular and had a lot of friends back then if you were wondering. Anyways, I've always cherished it since then and until very recently I enjoyed putting, what I considered, hi-larious calendars in them. Like this year's Cats doing Yoga. 


Funny right? And I hate cats. Hate them. So that makes it even funnier! {To me. And only me. But definitely not my husband.}  

So I decided to take this calendar holder thing more seriously and give it a makeover. 

I painted it. I added cork board. And found a serious calendar (seriously cute, that is).

And see?!


It's fun. It's colorful. And it's a perpetual calendar which means I can buy more and keep using the same calendar year after year after year! After year! 

{I probably won't be doing that considering how easily bored I get, but this shop has some other really cute options!}

And some close up shots....


Other than that I recently pretended I was a photographer again...


Last one makes me laugh like I just saw some cats doing yoga. 

Anyways, Happy almost Friday!

<3 Lindsey

Friday, November 2, 2012

[december class + sneak peak] a*door*able decor

Had my November wreath class last night and it was a success!

Meaning, I didn't completely confuse everyone with my awkward explanations on how to make it.

So mission accomplished! ; )

Seriously can't believe there are more than 5 people out there who want to make one of my wreaths.

Boggles my mind every time and makes me so incredibly grateful.

Next month's class is going to be.... <drum roll>

THIS!
It's a wreath that holds your favorite cards with little candy cane clothespins! Five will be included with the wreath. And already painted cause I love my students THAT much.

I'll have most of it ready to assemble too. So you'll just have to bring your sewing machine (For making a ruffle. We have sewing machines you can rent for $5 at the store!), glue gun, glue sticks, liquid glue (like Tombo Aqua-my fav), and scissors!

Class is $35 and you can save 10% on it when you sign up HERE! Class is on Dec. 1st @ 10:30!

Oh and one more thing! I'll have kits that are in a red/green version of this too! So either one should coordinate with whatever sort of color scheme you have going on these holidays : )

And because I have no patience waiting more than 5 minutes on things that make me excited, I have a sneak peak for January's wreath class!

Ready?

Ta-da!


It has lots of pretty ruffled tulle, a large felt bow, and three glittery snow flakes. Simple, but cute. You can click on the picture to see a close up of it. And all you'll need for this class is scissors and lots of hot glue.

Well, hope you love it. Don't have a date for it yet, but most likely the class will be Jan 5th. I'll keep you all posted when I know for sure. I'll have a sneak peak for Febuary's wreath real soon too. SO excited with how it's turning out so far. <eek!>

Talk to you soon!

<3 Lindsey

Wednesday, October 31, 2012

[happy]

HALLOWEEN!


Look at those cute trick-or-treaters.

This was my first year, as an adult, getting dressed up for Halloween. And I gotta say it was a lot of fun. And all because Mod Cloth sent me the wrong dress. And then let me keep it. For free! {thanks Mod Cloth!} Might branch out next year and actually be something. The kids didn't think wearing orange and black counted...baby steps, children. Baby steps.

Anyways hope you all had a fun, not too scary Halloween too!

<3 Lindsey

Monday, October 29, 2012

[friendly reminder]

You know, since my old post about this went bye-bye.

This Thursday @ 5:30 I'm teaching another wreath class at ETC. This month it's all about Fall!

Supplies are included [just need scissors, glue gun, and disappearing ink pen or, my favorite, a Frixion pen!]

And the chalkboard banner is completely customizeable!

Only 10 spots left, so SIGN UP HERE if you want to come! And save 10% on the class when you do!

<3 Lindsey

p.s. If you don't come for the wreath, then you gotta come for my Twix brownies! ; )

[embroidery project] make believe

So just a refresher, I was on Pinterest the other day month and saw this print...


Let me back track by saying I'm sorta obsessed with embroidery lately and really really wanted to learn how to do it.

So after seeing this print, and realizing for the 100th time that I STILL had Easter decorations hanging up by our bookcases in September, I decided this would be the perfect replacement. So I made this...


An embroidery pattern! [Feel free to upload this and use it as a pattern too!]

And just a fyi, I used the light box method and traced the pattern on scrap fabric I had on hand from my Granny aka Great Gramma using a Frixion pen. [if you don't have a Frixion pen, I highly recommend buying one! You can buy them at ETC or an office supply store] 

Here are some other methods for transferring embroidery patterns and also a video for different embroidery stitches. They were both very helpful while working on this! 

It was definitely more tedious than I thought it would be. And probably not the best beginniner project. But I eventually finished it. And I am so happy with how it turned out. 


I love how well it coordinates with the fabric I had on hand. And it makes me super happy that it has sentimental meaning too. I never met my Granny, but I know just based on her taste in fabric we would have gotten along really well and I would have learned so much from her. I also have an incomplete quilt from her that I'm kinda intimidated, but mostly excited to finish. Hopefully I'll have a post about that in the near future...

And "make believe" by our bookcases?? Totally perfect. I love to read, so making that area an even happier place by adding these embroidery hoops just makes me the most excited dork on Earth. 

<3 Lindsey


Wednesday, October 24, 2012

[my miracle day]

It's probably about time I did this post.

Today I celebrate my sweet girl, Emersynn's, 9th birthday.


And I consider it a miracle that I'm here to celebrate it with her.

I'll try not to make this a novel, but 9 years ago immediately after giving birth to Emersynn, I started to hemorrhage.

Which wasn't a huge surprise for me since I hemorrhaged after having my second child, Kellan, too.

But this time was way worse.

Laying in the hospital bed [my mom and husband beside me while Emersynn was being examined by the nurses] my doctor was busy trying to stop the bleeding. She realized quickly that while trying to remove my placenta that my uterus was attached to it.

The bleeding got worse.

So before I knew it, the nurses made my husband and mom leave and I was wheeled to an OR room. Barely conscience by that point because of how much blood I had lost.

I ended up being in the operating room for over four hours.

My doctor couldn't find blood that matched mine.

It had to be flown in and police escorted to the hospital.

Where an IV was then placed in my neck because that was the quickest way the blood could get to my heart and save me.

My body had gone into shock while I was waiting and I had to be resuscitated for 8 minutes.

A chaplin had gone out to the waiting room to tell my husband, friends, and family I might not make it.

I ended up recieving 16 units of blood total.

My doctor also ended up doing an emergency partial hysterectomy to save me. I have a 6" long scar to prove it!

Most moms that bleed that much, either don't make it or suffer from brain damage afterwards.

[Still debating some days whether or not my brain was effected from it! <Mostly> kidding! ; )]

By the grace of God and those donors, I'm here 9 years later.

100% healthy.

And funny story, afterwards while in ICU and sedated, the doctors knew I was going to be just fine after I removed my own breathing tube not once but twice.

[Nolan with Emersynn while I was in the OR]

Before I had Emersynn I never thought about donating blood. Or why it was important.

I actually had the opportunity to donate my senior year in highschool and didn't because I was afraid of needles!

I feel like this happened to me, so I could share why it is not only so important, but one of the greatest gifts you can give to someone.

While sharing my story is sometimes difficult, I try to do it as much as possible. Even doing speaking events (eek!) at United Blood Service events.

[Me and my blood buddy, Gerry, at one of those speaking events. He's one of my 16 donors]

So yeah, today is more than just my little girl's birthday. It's a day to celebrate second chances. And being thankful for all this time God has given me. A day not to think about what could have been, but be thankful for what I have.

[so blessed]

<3 Lindsey

P.S. Go donate blood!


Tuesday, October 23, 2012

[bummer city]

So you may notice that the blog has a new look.

I guess you could say it was a happy (?) accident.

While trying to edit the settings on Google+, I accidentally deleted ALL the photos on my blog.

And there was nothing I could do to get them back.

I had the option to either upload them all over again OR start over.

For the time being, I'm starting over.

Thought I'd even give the blog a new look while I was at it.

(Hope you approve!)

After I get over this depressing realization, I plan to very slowly get all the old posts back up.

Till then, it's a brand new start to Very Truly Me.

Sometimes that's a good thing.

<3 Lindsey


Monday, June 18, 2012

[sunshine quilt] tutorial


This was inspired by a quilt I saw on Pinterest. You can see it HERE! But I added my own twist to it.

{She has a great tutorial to go along with it as well! So if mine doesn't make sense, check hers out!}

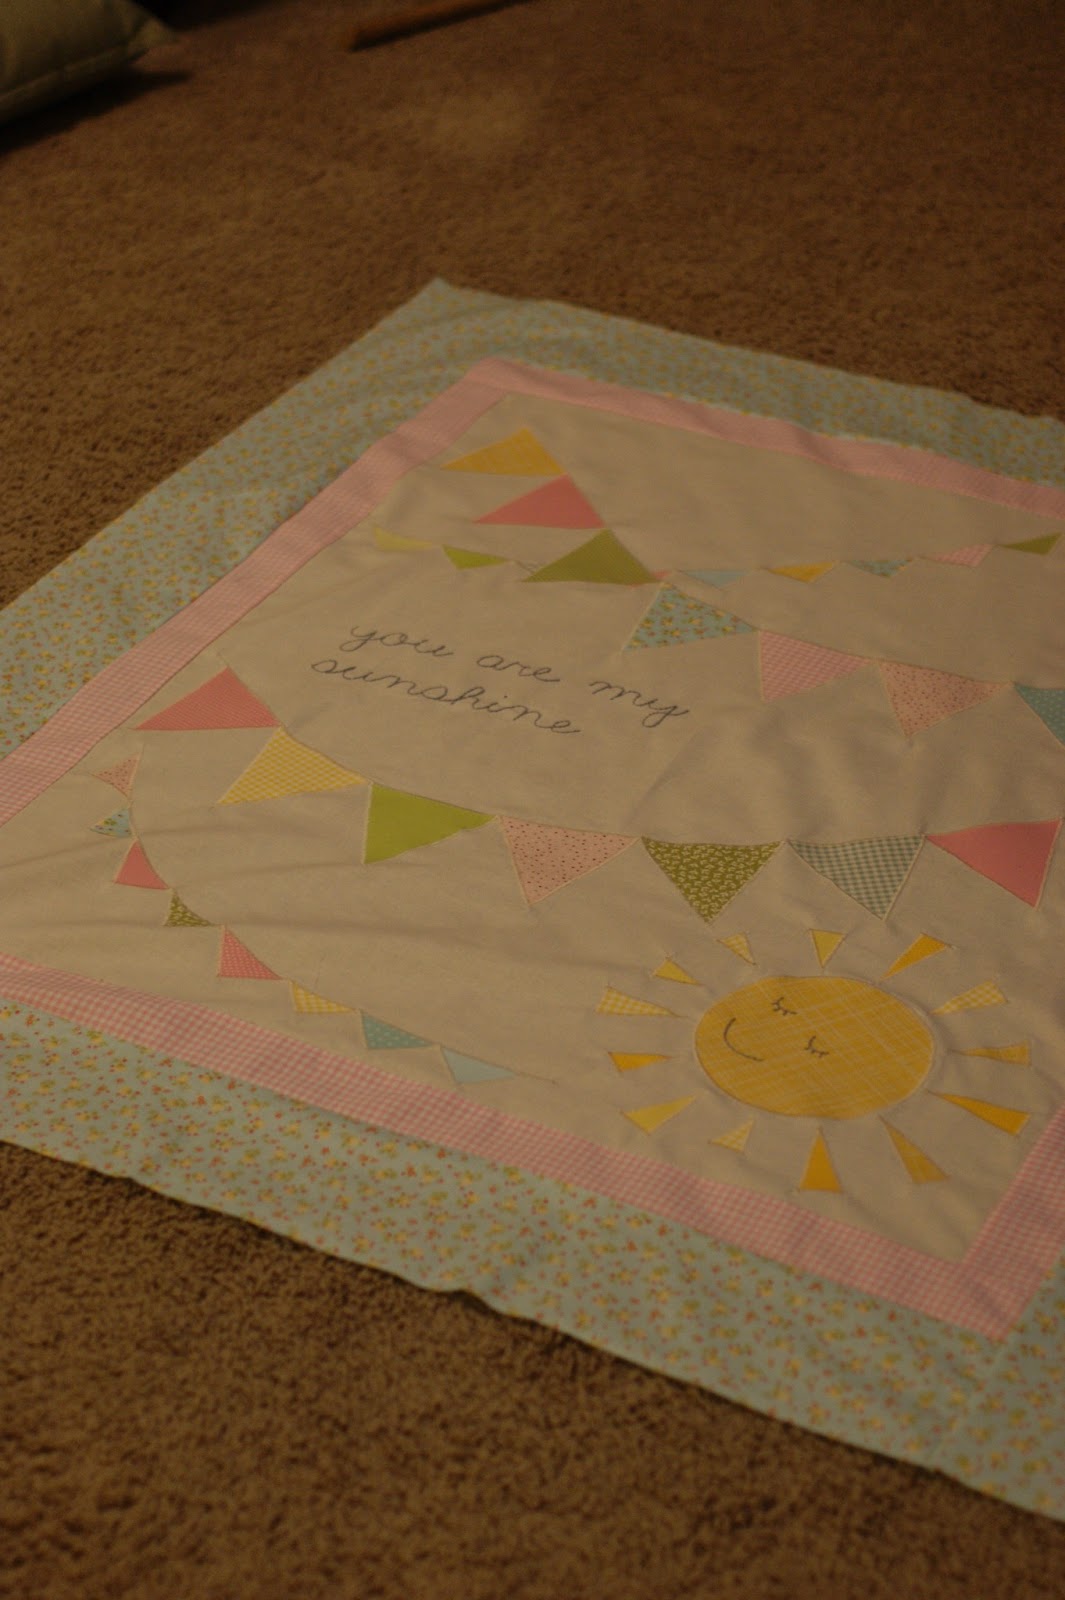
I have a special place in my heart for the song, "You are my Sunshine" so I wanted to incorporate that for my friend and her new baby girl somehow.

And this is what I came up with!


{You can see more pics of it HERE}


Here's how you make it!

{Just like with my last quilt tutorial, this one also requires at least some basic knowledge of quilt making. If you live in AZ and want to learn how to make quilts, I highly recommend taking the beginning quilt class at ETC!}

Supplies:

1 yard of muslin or neutral
Scraps for the pennant flags {Enough fabric to make 16 4x4 squares}
Scraps for the sun {a few fat quarters should be plenty!}
1/2 yard for inner border
1 yard for outer border
1/2 yard for binding
3 yards of wonder under
2 yards for backing
Batting (crib size)
Coordinating thread {I used off white for the whole thing!}
Embroidery floss

1} Cut out a 36" x 30" piece with your muslin.


I ironed it and laid mine out on our ping pong craft table to get it ready to lay my flags out on.


I determined the composition of my pennant flags by drawing it out on paper numerous times and finally came up with this!


Next I cut out 16 4"x4" squares in coordinating fabrics and 16 4"x4" squares in wonder under. I believe I used about 13 different scraps of fabric. I ironed the two together and once that was finished I took a water soluble fabric pen and on each square on one side marked the half way point (2") and then drew a line from that mark to the two corners on the opposite side to make my triangle/pennant flag.


Then I cut them out!


Save your scraps! Cause you'll be taking those and cutting out your 17 little pennant flags.


I took one of the two scraps (doesn't matter which) and marked 1 3/4" from the corner on each side.


Cut along that line and you now have a little pennant flag. You'll need 17 of them total.

Now using the water soluble fabric pen, draw 4 swooping lines on your muslin/neutral fabric where you'll want the pennant flags to go. Take your muslin and your flags over to the ironing board and first lay out your little flags {make sure you leave an inch or two from the edge for seam allowance} and then start ironing them on. The large flags can be ironed on next.


This is what it should look like when you're done.

Next cut out a 7" square of fabric and wonder under for your sun. Iron them together. Take a some cardstock or any thick paper and cut out a 5 1/2" circle. Trace the circle on the fabric and cut out.

I took my leftover yellow pieces from my large pennant flags and very randomly cut out triangles. Didn't measure them or make them look perfect. Just cut them out so they were all in different sizes. They all varied in size from 2 1/2" to 1".

I arranged the sun and the rays on the muslin till I was happy with how it looked. I pinned them in place and took it over to the ironing board and ironed them on.


I then prematurely drew the face on and with my fabric pen. {I would wait till after you applique the flags and sun on to do this}

After everything was ironed on, I used a zig zag stitch and appliqued like crazy.

TIPS:

Zig zag stitch along the top of the large pennant flags in a long swooping line and then go back and stitch along each side of the flags.

Stitch the little pennant flags last! Avoid stitching over the larger flags.

After the applique was done, I worked on the embroidery.

I redrew the sun's face and wrote out in Word "you are my sunshine" in a font called "The only exception". You can find that font for free HERE.

It's up to you how big you want the wording to be. After I printed it out, I laid it under the muslin so I could then trace the wording with my fabric pen.

Next I turned on the Food Network, got a needle and some embroidery floss, and stitched the wording and sun's face using a back stitch.


I then cut out 4 2 1/2" x WOF strips for the inner border and sewed them on. And like I mentioned in my previous post, I was able to use my daughter's old curtains for not only this part, but for some of the flags and the backing too! Great way to save money!

After that was finished and I pressed the seams, I then cut out 5 5" x WOF strips for the outer border. I cut one of those strips in half and pieced each one with one of the other strips of fabric making 2 longer strips.

I sewed those on and pressed the seams.

And TA-DA! Top is finished! Finished this in 5 hrs!


This part is optional, but I then had my blanket quilted by a professional. You could TOTALLY do this part yourself! But I didn't have the time, nor the faith, to do it myself.

Once I got it back from the quilter, I cut out 6 2 1/4"x WOF strips for the binding, sewed it on, washed it, and this is how it turned out!


Pretty happy with how it looks and can't wait to hear what my friend, Kim, thinks about it! And also to see pics of her baby girl wrapped up in it too.

This quilt was so easy and inexpensive. A great way to use all those scraps!

Any questions about the project, feel free to post in the comment section below!

<3
Lindsey